QR Campaigns
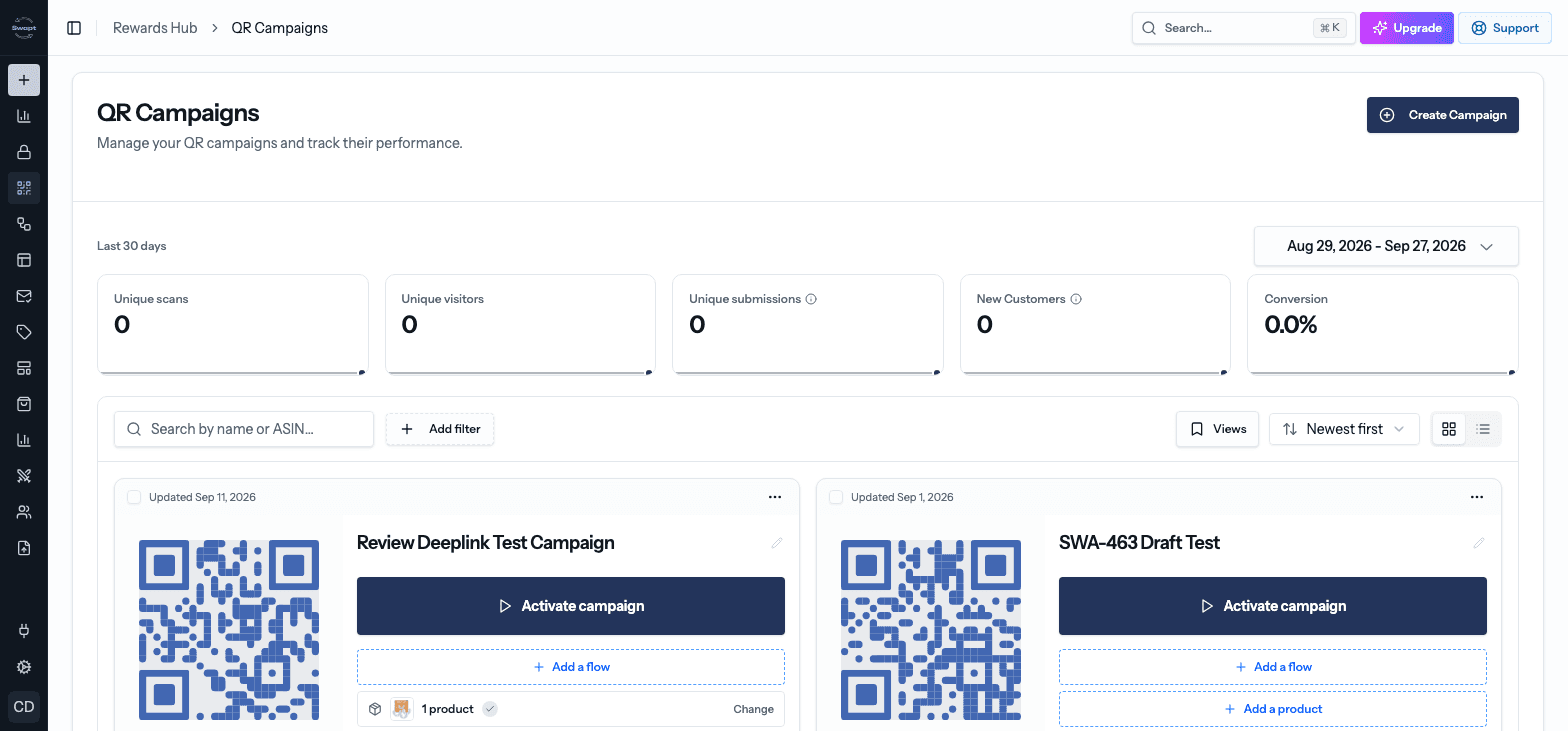
Order QR codes for your products, choose the flow they run, and measure every scan in one place.
A QR campaign ties together the QR codes on your packaging, the flow customers go through when they scan, and the products the codes belong to. Everything is measured together, so you can see how each campaign performs.
You'll find it under Rewards Hub → QR Campaigns.
Create a campaign
New campaigns start from an order of QR codes.
Click Create Campaign. This opens the Create order page, where each row is one product — and each row becomes its own campaign with its own QR codes.
Fill in a row for each product. You can add more rows with Add row → New campaign. A product ASIN is optional — codes still get printed, and you can point them at a product later.
Click Review order, check everything on Review and confirm order, then click Place order.
Back on QR Campaigns, choose the flow each campaign should run (see below).
See QR Codes for designing your codes, choosing sizes, and printing.
A campaign that hasn't been ordered yet shows an Activate campaign button on its card. Click it to review the details and order its QR codes.
Choose the flow a campaign runs
On a campaign's card, click Add a flow (or Change next to the current flow) and pick one from Select Flow. Choose No Flow to remove it. You can switch flows at any time — the printed codes follow whichever flow is attached, so nothing needs reprinting.
Select Flow also lists Templates. Picking one makes your own copy of that template flow and attaches it to the campaign, so you can edit it without changing the template.
Assign a flow to many campaigns at once
Tick the checkbox on each campaign you want to change (or, in table view, select all campaigns on the page).
In the bar that appears, click Assign flow.
Pick a flow. If more campaigns match your current filters than you selected, you can choose to apply it to all campaigns matching the current filters.
Click Assign to N campaigns. The new flow replaces whatever flow those campaigns had.
Catalog campaigns
Beta
A catalog campaign gives every product in your catalog its own permanent QR code, all running the same flow. It's the easiest way to cover a large product line.
Click Catalog Campaign (or, if you already have one, Catalog Campaigns → New catalog campaign).
Give it a Name and choose Products:
- My whole catalog — every active product, and anything you add later automatically gets a code too.
- Selected products — only the products you pick with Choose products. Use this to run a second catalog with a different flow.
Click Create campaign, then pick the flow for all the codes with Attach flow.
On the catalog campaign's page you'll see how many Live codes it has, a Product codes table with each product's scans, and buttons to Sync products, Export CSV, and Download QR codes. Removing a product archives its code rather than deleting it.
Catalog campaigns are marked with a Catalog tag on the QR Campaigns page.
Preview a campaign
Want to see exactly what customers see? Use a preview — submissions and analytics aren't counted, and one-time-use codes aren't used up.
- Preview on phone (on a campaign's ⋯ menu, or on its detail page) shows a QR code you can scan with your phone, plus a link you can copy or open in Open in phone preview.
- Copy Preview Link on the campaign's detail page copies a link that's safe to share with teammates.
To copy the real, live link customers use, click Copy link (multi-use campaigns only).
Find your campaigns
- Search by name or ASIN, and use Add filter to narrow by name or ASIN, product, created date, or Activity (Recently active, Stale (30+ days), Never scanned).
- Sort by date, name, scans, or conversion.
- Switch between Card view and Table view.
- Save your filters and sort as a view under Views → Save current view…. You can share a view with your organization or make it your default.
Measure a campaign
The top of the QR Campaigns page shows totals for the date range you pick: Unique scans, Unique visitors, Unique submissions, New Customers, and Conversion, each compared with the previous period.
Open a campaign and switch to its Analytics tab for the details:
- Total Visits, Unique Visitors, Submissions, Button Clicks, and Conversion, plus Visits Over Time.
- Captured Customers — everyone who submitted through the campaign. Switch between Live, Preview, and All to include or exclude preview-link test submissions, and use Export CSV to download them.
- Button Click Analytics — button clicks, product reviews, discount copies, and Returning Visitors (people re-scanning a code they've already used).
- Per-order comparison — if you've ordered codes for the campaign more than once, compare how each order is performing.
Campaign numbers use the same definitions as your home dashboard, so they always match. Learn more in Analytics.
Returning customers
In a campaign's Settings tab, turn on Show discount code to returning visitors so that when a customer re-scans a code they've already used, they see the discount code they were given.
Reorder codes
Running low? On the campaign's ⋯ menu choose Reorder codes, or click Reorder on a past order in the campaign's Settings tab.
A reorder is locked to the campaign's existing design and products — only the quantity (and shipping) can change. That keeps every code in a campaign consistent. If you want a different design or product, create a new campaign instead. You can reorder several campaigns and order brand-new ones in the same order using Add row → Reorder an existing campaign.
Bulk upload
Beta
To create lots of campaigns at once, open the ⋯ menu at the top of the QR Campaigns page and choose Bulk upload.
Click Download CSV template and fill in one row per campaign.
Under Flow source, choose Use a template or Reuse an existing flow.
Drop your CSV file in, check the Preview, then click Start bulk import.
Swapt shows the progress of each import, row by row. If any rows fail, click Download error CSV to see what to fix.
Delete a campaign
Choose Delete from a campaign's ⋯ menu, or select several campaigns and click Delete in the selection bar.